
Coding IntelliJ Plugin in Scala - first steps
I’m not surprised if IntelliJ IDEA is your favourite IDE. If so, you must have been thinking many times how it is made. There are many things you must cover to understand it well, e.g., Virtual Files, Threading Rules, PSI Files, Actions, etc., but have you ever wondered if it possible to imporve your best IDE using Scala language?
As I mentioned before, there are many things you must understand. Firstly, you must see IntelliJ IDEA Architectural Overview, this is a great article explaining all the details of ‘invisible’ parts of IntelliJ IDEA. You may ask why? The answer is simple: you want to create your first IntelliJ IDEA plugin and as if all that weren’t enough, you’re gonna do it using Scala.
###IntelliJ IDEA Plugins
As you probably know, IntelliJ IDEA has many extensions, browse Plugins repository to see hundreds of them:
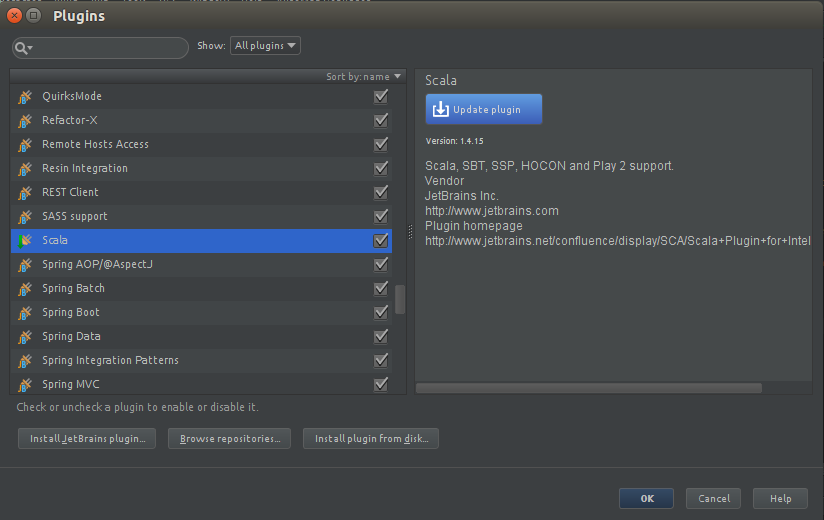
As you can see one can install official JetBrains plugins, browse alternative users’ repositories or just install plugin form disk, the last option is the most important for us, because this way we would install our own plugin which we are going to develop during this short article.
###IntelliJ IDEA Plugin Development
If you read IntelliJ IDEA Architectural Overview carefully you probably know, that IntelliJ IDEA is build on the top of Java. So Java is a natural choice if you think about IntelliJ IDEA plugin development. Java is a great language, it has a world-wide community support, you can find many useful tutorials and a lot of documentation related to IntelliJ IDEA plugin development. One of the best articles I’ve ever seen is Getting Started with Plugin Development. It covers all the things you need to do, it starts with configuring IntelliJ IDEA SDK, creating a new plugin module, creating a simple Action, registering your plugin and finally running it.
There are two problems with this article, the page is completely out of date for now and says nothing about developing in Scala. Actually, there are no tutorials about IntelliJ IDEA plugin development in Scala at all.
What we will do now is to follow Getting Started with Plugin Development, but in a Scala way!
###IntelliJ IDEA Plugin Development in Java
Before you start coding your own IntelliJ IDEA plugin, you should get to know with PluginDevelopment. It can be called ‘the IntelliJ IDEA Plugin Bible’, I’m not kidding, just go through it.
Now you should spend some time and follow Getting Started with Plugin Development.
If you did everything carefully you should now have a plugin which consists of a single action called TextBoxes, your code should look more or less like this:
import com.intellij.openapi.actionSystem.AnAction;
import com.intellij.openapi.actionSystem.AnActionEvent;
import com.intellij.openapi.project.Project;
import com.intellij.openapi.ui.Messages;
...

public class TextBoxes extends AnAction {

    // If you register the action from Java code, this constructor is used to set the menu item name
    // (optionally, you can specify the menu description and an icon to display next to the menu item).
    // You can omit this constructor when registering the action in the plugin.xml file.
    public TextBoxes() {
        // Set the menu item name.
        super("Text _Boxes");
        // Set the menu item name, description and icon.
        // super("Text _Boxes","Item description",IconLoader.getIcon("/Mypackage/icon.png"));
    }

    public void actionPerformed(AnActionEvent event) {
        Project project = event.getProject();
        String txt= Messages.showInputDialog(project, "What is your name?", "Input your name", Messages.getQuestionIcon());
        Messages.showMessageDialog(project, "Hello, " + txt + "!\n I am glad to see you.", "Information", Messages.getInformationIcon());
    }
}
You should have it registered in you plugin.xml file:
...
<actions>
    <group id="MyPlugin.SampleMenu" text="_Sample Menu" description="Sample menu">
        <add-to-group group-id="MainMenu" anchor="last"  />
        <action id="Myplugin.Textboxes" class="TextBoxes" text="Text _Boxes" description="A test menu item" />
        <!--<action id="Myplugin.Dialogs" class="Mypackage.MyShowDialog" text="Show _Dialog" description="A test menu item" />-->
    </group>
...
</actions>
...
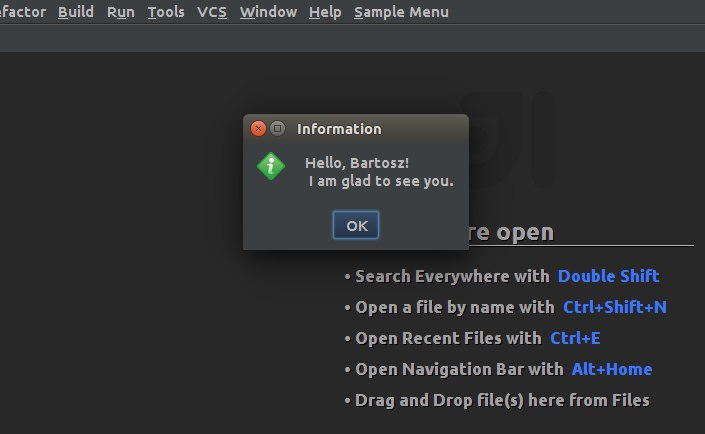
If you start IntelliJ IDEA with your plugin installed, you should see a simple dialog when you use activate your plugin:
Now you are able to develop your plugin using Java, but it’s not what we wanted all the time, let’s do this again, but using Scala.
###IntelliJ IDEA Plugin Development in Scala
I assume you are familiar with Scala (at least basics of the language) and you code Scala in IntelliJ (so you have a Scala Plugin configured, if not do this this way).
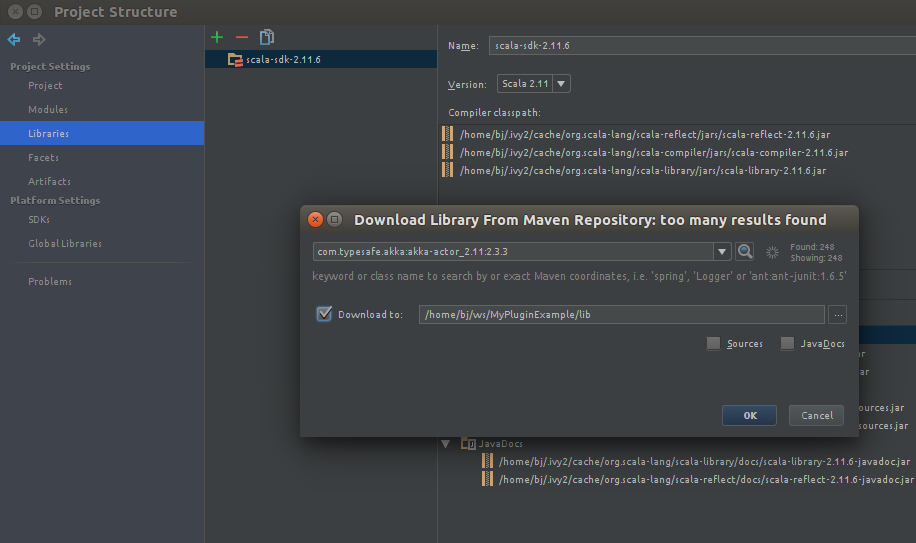
First of all, you need to attach a Scala SDK to your plugin module.
Go to the plugin Module Settings -> Libraries, click on the Plus Button (+) and choose Scala SDK.
You should add (or download) scala-sdk-2.11.6 library - it is one of the most important steps!
In a Java example you have a class which extends AnAction abstract class. Let’s create a Scala class the same way:
import com.intellij.openapi.actionSystem.{AnActionEvent, AnAction}
import com.intellij.openapi.project.Project
import com.intellij.openapi.ui.Messages
...

case class TextBoxesInScala() extends AnAction("Text _Boxes in Scala"){
  override def actionPerformed(anActionEvent: AnActionEvent): Unit = {
    val project: Project = anActionEvent.getProject
    val txt: String = Messages.showInputDialog(project, "What is your name?", "Input your name", Messages.getQuestionIcon)
    Messages.showMessageDialog(project, "Hello from Text Boxes in Scala, " + txt + "!\n I am glad to see you.", "Information", Messages.getInformationIcon)
  }
}
Is all that simple, as Scala compiles to JVM, even all the imports are the same. Now you only use a different syntax.
Register your action the same way as you did before:
...
<actions>
    <group id="MyPlugin.SampleMenu" text="_Sample Menu" description="Sample menu">
        <add-to-group group-id="MainMenu" anchor="last"  />
        <action id="Myplugin.Textboxes" class="TextBoxes" text="Text _Boxes" description="A test menu item" />
    </group>
    <group id="MyPluginInScala.SampleMenu" text="_Sample Menu in Scala" description="Sample menu in Scala">
        <add-to-group group-id="MainMenu" anchor="last"  />
        <action id="Myplugin.TextBoxesInScala" class="TextBoxesInScala" text="Text _Boxes in Scala" description="A test menu item in Scala" />
    </group>
</actions>
...
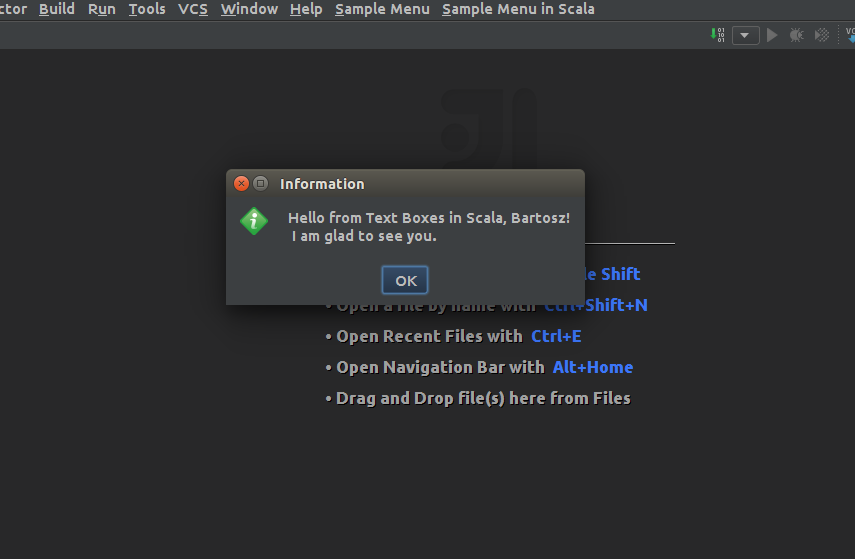
Now run your plugin and this is what you should see, your TextBoxesInScala Action written in Scala:
Since now you are able to create your plugins using Scala only, but wait, where is SBT?
###Additional Scala dependencies
As you probably noticed, youe plugin project doesn’t have any build systems like SBT. Actually, SBT is not needed. You may ask yourself how would you add Scala extensions like Akka or Spray.
It is very easy, let’s do this now, let’s say you would like to add Akka Actors to your plugin.
Go to the plugin Module Settings -> Libraries, click on the Plus Button (+) and choose From Maven…, now find library you need and add it your module.
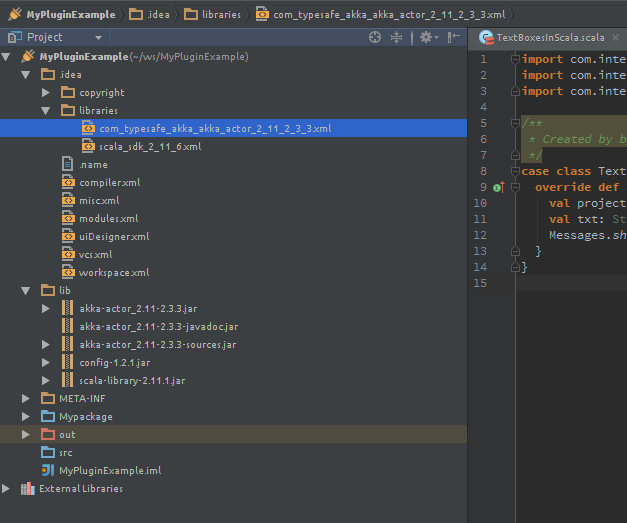
And that’s all, as a confirmation, you shuould see a proper com_typesafe_akka_akka_actor_2_11_2_3_3.xml file and downloaded JARs files in /lib/ directory:
Go to your TextBoxesInScala class and add Akka Actor behaviour:
import akka.actor.Actor
import akka.actor.Actor.Receive
import com.intellij.openapi.actionSystem.{AnActionEvent, AnAction}
import com.intellij.openapi.project.Project
import com.intellij.openapi.ui.Messages

case class TextBoxesInScala() extends AnAction("Text _Boxes in Scala") with Actor{
  override def actionPerformed(anActionEvent: AnActionEvent): Unit = {
    val project: Project = anActionEvent.getProject
    val txt: String = Messages.showInputDialog(project, "What is your name?", "Input your name", Messages.getQuestionIcon)
    Messages.showMessageDialog(project, "Hello from Text Boxes in Scala, " + txt + "!\n I am glad to see you.", "Information", Messages.getInformationIcon)
  }

  override def receive: Receive = {
    case _ => println("Hello from TextBoxesInScala Akka Actor")
  }
}
It was easy, wasn’t it?
Now you are a full stack Scala IntelliJ IDEA Plugin developer. You are able to create amazing things now :)!
You can find all the code samples on my GitHub page, just clone https://github.com/BartoszJanota/intellij-plugin-in-scala-example and check it out.
Enjoy :)